728x90
반응형
[Spring Boot] Spring Boot에서 Thymeleaf 사용하는 이유와 기본 문법 정리
[Spring Boot] Spring Boot에서 Thymeleaf 사용하는 이유와 기본 문법 정리
[Spring Boot] Spring Boot 프로젝트에 Thymeleaf 템플릿 엔진 적용하기 [Spring Boot] Spring Boot 프로젝트에 Thymeleaf 템플릿 엔진 적용하기[Spring Boot] Spring Boot에서 다중 파일 업로드(Multi File Upload) 구현 가이드 [
crushed-taro.tistory.com
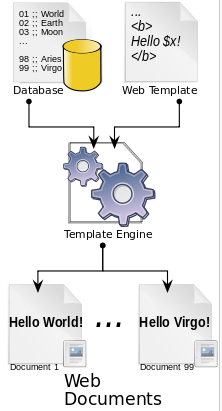
1. Thymeleaf
1. 타임리프의 문법
1. 제어문
| 종류 | 문법 | 설명 |
| if문 | th:if="${ONGL을 통한 조건식}" | 변수 표현식의 OGNL을 활용한 조건식으로 조건문을 작성하면 결과가 true일 때 해당 태그 범위가 처리된다. |
| else문 | th:unless="${ONGL을 통한 조건식}" | 변수 표현식의 OGNL을 활용한 결과가 false일 때 해당 태그 범위가 처리된다. |
| 다중조건처리문 | th:if="${ONGL을 통한 조건식 and ONGL을 통한 조건식...}" | 변수 표현식의 OGNL을 활용한 조건식들과 and 또는 or를 통해 다중 조건문을 작성하고 결과가 true일 때 해당 태그 범위가 처리된다. |
| switch문 | th:swith="${...}과 th:case="리터럴" | th:switch와 th:case를 통해 해당 조건의 값이 어떤 case에 해당되는지에 따라 태그를 선택할 수 있다. |
| each문 | th:each="변수 : ${collection값}" | 컬렉션에 해당하는 값들을 하나씩 변수에 담아 collection의 크기만큼 반복하여 태그를 처리한다. |
if문 / else문 / 다중조건처리문
// ModelAndView의 Model에 추가
mv.addObject("num", 1);
mv.addObject("str", "바나나");
<p th:if="${ num > 0 }">넘어온 값은 0보다 크다.</p> <!-- 조건에 해당되면 -->
<p th:if="${ num < 0 }">넘어온 값은 0보다 작다.</p>
<p th:unless="${ num < 0 }">넘어온 값은 0보다 크다.</p> <!-- 조건에 해당하지 않으면 -->
<th:block th:if="${ str == '사과' }"> <!-- th:block을 사용할 수도 있다. -->
<p>사과 좋아요!</p>
</th:block>
<th:block th:if="${ str == '바나나' }">
<p>바나나 좋아요!</p>
</th:block>
<!-- and나 or를 사용해서 다중 조건 처리도 가능하다. -->
<p th:if="${ num > 0 or num <= 10 }">1부터 10까지의 양수</p>
<p th:if="${ str != null and str == '바나나' }">바나나 좋아요!</p>
<!-- #strings라는 타임리프에서 제공하는 Utility Objects에서 제공하는 메소드를 통해서도 null에 대한 처리를 할 수 있다. -->
<p th:if="${ !#strings.isEmpty(str) and str == '바나나' }">바나나 좋아요!</p>
switch문
// ModelAndView의 Model에 추가
mv.addObject("str", "바나나");
<th:block th:switch="${ str }">
<span th:case="사과">사과가 선택되었습니다</span>
<span th:case="바나나">바나나가 선택되었습니다</span>
</th:block>
each문
// ModelAndView의 Model에 추가 (name, age, gender, address)
List<MemberDTO> memberList = new ArrayList<>();
memberList.add(new MemberDTO("홍길동", 20, '남', "서울시 서초구"));
memberList.add(new MemberDTO("유관순", 22, '여', "서울시 노원구"));
memberList.add(new MemberDTO("장보고", 40, '남', "서울시 종로구"));
memberList.add(new MemberDTO("신사임당", 30, '여', "서울시 성북구"));

mv.addObject("memberList", memberList);
<table>
<tr>
<th>이름</th>
<th>나이</th>
<th>성별</th>
<th>주소</th>
</tr>
<tr th:each="member : ${ memberList }">
<td th:text="${ member.name }"></td>
<td th:text="${ member.age }"></td>
<td th:text="${ member.gender }"></td>
<td th:text="${ member.address }"></td>
</tr>
</table>
<!-- th:each에 stat을 추가해서 반복상태를 확인할 수 있다. -->
<table>
<tr>
<th>이름</th>
<th>나이</th>
<th>성별</th>
<th>주소</th>
<th>INDEX</th>
<th>COUNT</th>
<th>SIZE</th>
<th>CURRENT</th>
<th>EVEN</th>
<th>ODD</th>
<th>FIRST</th>
<th>LAST</th>
</tr>
<tr th:each="member, stat : ${ memberList }">
<td th:text="${ member.name }"></td>
<td th:text="${ member.age }"></td>
<td th:text="${ member.gender }"></td>
<td th:text="${ member.address }"></td>
<td th:text="${ stat.index }"></td>
<td th:text="${ stat.count }"></td>
<td th:text="${ stat.size }"></td>
<td th:text="${ stat.current }"></td>
<td th:text="${ stat.even }"></td>
<td th:text="${ stat.odd }"></td>
<td th:text="${ stat.first }"></td>
<td th:text="${ stat.last }"></td>
</tr>
</table>
<!-- th:each에 stat을 추가하지 않으면 '변수명+Stat'으로 반복상태를 확인할 수 있다. -->
<table>
<tr>
<th>이름</th>
<th>나이</th>
<th>성별</th>
<th>주소</th>
<th>INDEX</th>
<th>COUNT</th>
<th>SIZE</th>
<th>CURRENT</th>
<th>EVEN</th>
<th>ODD</th>
<th>FIRST</th>
<th>LAST</th>
</tr>
<tr th:each="member: ${ memberList }">
<td th:text="${ member.name }"></td>
<td th:text="${ member.age }"></td>
<td th:text="${ member.gender }"></td>
<td th:text="${ member.address }"></td>
<td th:text="${ memberStat.index }"></td>
<td th:text="${ memberStat.count }"></td>
<td th:text="${ memberStat.size }"></td>
<td th:text="${ memberStat.current }"></td>
<td th:text="${ memberStat.even }"></td>
<td th:text="${ memberStat.odd }"></td>
<td th:text="${ memberStat.first }"></td>
<td th:text="${ memberStat.last }"></td>
</tr>
</table>
2. SpringEL
- 변수 표현식(${...})에서 SpringEL을 사용하여 단순한 변수가 아닌 Object, List, Map같은 객체의 값들을 불러올 수 있다.
| 종류 | 문법 | 설명 |
| Object | ${객체명.속성명} | 해당 객체의 속성값을 불러온다. |
| ${객체명['속성명']} | ||
| ${객체명.속성의 getter()} | ||
| List | ${List객체명[index번째 객체].속성명} | List에서 index번째 객체의 속성을 불러온다. |
| ${List객체명[index번째 객체]['속성명']} | ||
| ${List객체명[index번째 객체].속성의 getter()} | ||
| ${List객체명.get(index번째 객체).속성의 getter()} | ||
| ${List객체명.get(index번째 객체).속성명} | ||
| Map | ${Map객체명['객체의 키값']['속성명']} | Map에서 키값에 해당하는 객체의 속성을 불러온다. |
| ${Map객체명['객체의 키값']['속성명']} | ||
| ${Map객체명['객체의 키값'].속성의 getter()} |
// ModelAndView의 Model에 추가 (name, age, gender, address)
MemberDTO member = new MemberDTO("홍길동", 20, '남', "서울시 서초구");

mv.addObject("member", member);

List<MemberDTO> memberList = new ArrayList<>();
memberList.add(new MemberDTO("홍길동", 20, '남', "서울시 서초구"));
memberList.add(new MemberDTO("유관순", 22, '여', "서울시 노원구"));
memberList.add(new MemberDTO("장보고", 40, '남', "서울시 종로구"));
memberList.add(new MemberDTO("신사임당", 30, '여', "서울시 성북구"));

mv.addObject("memberList", memberList);

Map<String, MemberDTO> memberMap = new HashMap<>();
memberMap.put("m01", new MemberDTO("홍길동", 20, '남', "서울시 서초구"));
memberMap.put("m02", new MemberDTO("유관순", 22, '여', "서울시 노원구"));
memberMap.put("m03", new MemberDTO("장보고", 40, '남', "서울시 종로구"));
memberMap.put("m04", new MemberDTO("신사임당", 30, '여', "서울시 성북구"));

mv.addObject("memberMap", memberMap);
<p>Object</p>
<ul>
<li th:text="${ member.name }"></li>
<li th:text="${ member['age'] }"></li>
<!-- 위 두가지 방식은 getter가 필요 없지만 getGender()는 반드시 해당 클래스에 getter가 있어야 한다. -->
<li th:text="${ member.getGender() }"></li>
</ul>
<p>List</p>
<ul>
<li th:text="${ memberList[1].name }"></li>
<li th:text="${ memberList[1]['age'] }"></li>
<!-- 위 두가지 방식은 getter가 필요 없지만 getGender()는 반드시 해당 클래스에 getter가 있어야 한다. -->
<li th:text="${ memberList[1].getGender() }"></li>
<li th:text="${ memberList.get(1).getGender() }"></li>
<li th:text="${ memberList.get(1).address }"></li>
</ul>
<p>Map</p>
<ul>
<li th:text="${ memberMap['m03'].name }"></li>
<li th:text="${ memberMap['m03']['age'] }"></li>
<!-- 위 두가지 방식은 getter가 필요 없지만 getGender()는 반드시 해당 클래스에 getter가 있어야 한다. -->
<li th:text="${ memberMap['m03'].getGender() }"></li>
</ul>
3. 기타
| 종류 | 문법 | 설명 |
| 타임리프 네임스키마 | xmlns:th="http://www.thymeleaf.org" | 타임리프를 활용하기 위해서는 html의 html태그에 네임스키마로 선언해 주어야 한다. |
| escape 적용 | th:text="${...}" | 변수 표현식의 값을 불러오지만 escape가 적용되어 태그를 단순 문자열로 처리하고 html에 표현한다. |
| escape 미적용 | th:utext="${...}" | 변수 표현식의 값을 불러오지만 escape가 적용되지 않아 태그를 태그로써 인식하게 처리하고 html에 표현한다. |
| value 속성 적용 | th:value="${...}" | 변수 표현식의 값을 불러와 태그의 value값을 지정한다. |
| 리터럴 치환 |
th:text=”|리터럴${…}리터럴|”
|
‘| ‘를 양 옆에 사용하면 ‘+’를 쓰지 않고 문자열 합치기를 할 수 있다. |
| 블럭태그 | th:block | 범위를 지정하고 싶을 때 사용한다. th:block을 통해 해당 범위에 변수나 객체를 적용하거나 조건에 해당되는지에 따라 해당 범위를 보여주거나 보여주지 않을 때 사용할 수 있다. |
| 지역변수 | th:with="변수명1 = ${...}, 변수명2 =${...}, ..." | 변수 표현식(${...})을 통해 불러온 값을 해당하는 변수명으로 해당 태그 범위의 지역변수가 되게 한다. |
| security 인증 정보 여부 | sec:authorize="isAuthenticated()” | 타임리프에서 시큐리티 적용 시 로그인, 로그아웃에 대한 이벤트를 줄 수 있다. |
타임리프 네임스키마
<html xmlns:th="http://www.thymeleaf.org">
escape 적용/미적용, value 속성 적용
태그의 값을 태그 내부의 값으로 작성하기 위해서는 th:text 또는 th:utext를 사용할 수 있다. th:text는 escape가 적용되어 태그를 단순 문자열로 처리하지만 th:utext는 escape가 적용되지 않아 태그를 태그로써 인식할 수 있다. (DB에 태그가 포함된 문자열을 저장했을 시 유용
th:value는 태그의 value값을 지정할 수 있다.
// ModelAndView의 Model에 추가
mv.addObject("hello", "hello!<h3>Thymeleaf</h3>");
<ul>
<li th:text="${ hello }"></li>
<li th:utext="${ hello }"></li>
<li><input type="text" th:value="타임리프"></li>
</ul>
리터럴 치환
// ModelAndView의 Model에 추가 (name, age, gender, address)
mv.addObject("member", new MemberDTO("홍길동", 20, '남', "서울시 서초구"));
<p th:object="${ member }" th:text="|name = '*{ name }'|"></p>
<p th:object="${ member }" th:text="|age = '*{ age }'|"></p>
<p th:object="${ member }" th:text="|gender = '*{ gender }'|"></p>
<p th:object="${ member }" th:text="|address = '*{ address }'|"></p>
블럭 태그
// ModelAndView의 Model에 추가 (name, age, gender, address)
mv.addObject("member", new MemberDTO("홍길동", 20, '남', "서울시 서초구"));
<th:block th:object="${ member }" >
<p th:text="*{ age }"></p>
</th:block>
지역 변수
// ModelAndView의 Model에 추가 (startPage, endPage, pageNo)
SelectCriteria selectCriteria = new SelectCriteria(1, 10, 3);
mv.addObject(selectCriteria);
<th:block th:with="start = ${ selectCriteria.startPage }, last = ${ selectCriteria.endPage }">
<th:block th:each="p : ${ #numbers.sequence(start, last) }">
<th:block th:if="${ selectCriteria.pageNo eq p }">
<button th:text="${ p }" disabled></button>
</th:block>
<th:block th:if="${ selectCriteria.pageNo ne p }">
<button th:text="${ p }"></button>
</th:block>
</th:block>
</th:block>
728x90
반응형
'Java > Spring Boot' 카테고리의 다른 글
| [Spring Boot] Spring Boot에서 Thymeleaf 사용하는 이유와 기본 문법 정리 (0) | 2025.09.22 |
|---|---|
| [Spring Boot] Spring Boot 프로젝트에 Thymeleaf 템플릿 엔진 적용하기 (2) | 2025.09.14 |
| [Spring Boot] Spring Boot에서 다중 파일 업로드(Multi File Upload) 구현 가이드 (0) | 2025.09.11 |
| [Spring Boot] Spring Boot File Upload 예제 | 이미지 및 파일 업로드 구현 가이드 (0) | 2025.09.07 |
| [Spring Boot] Spring Boot에서 Interceptor 사용하기 | 설정부터 실전 예제까지 (0) | 2025.09.02 |