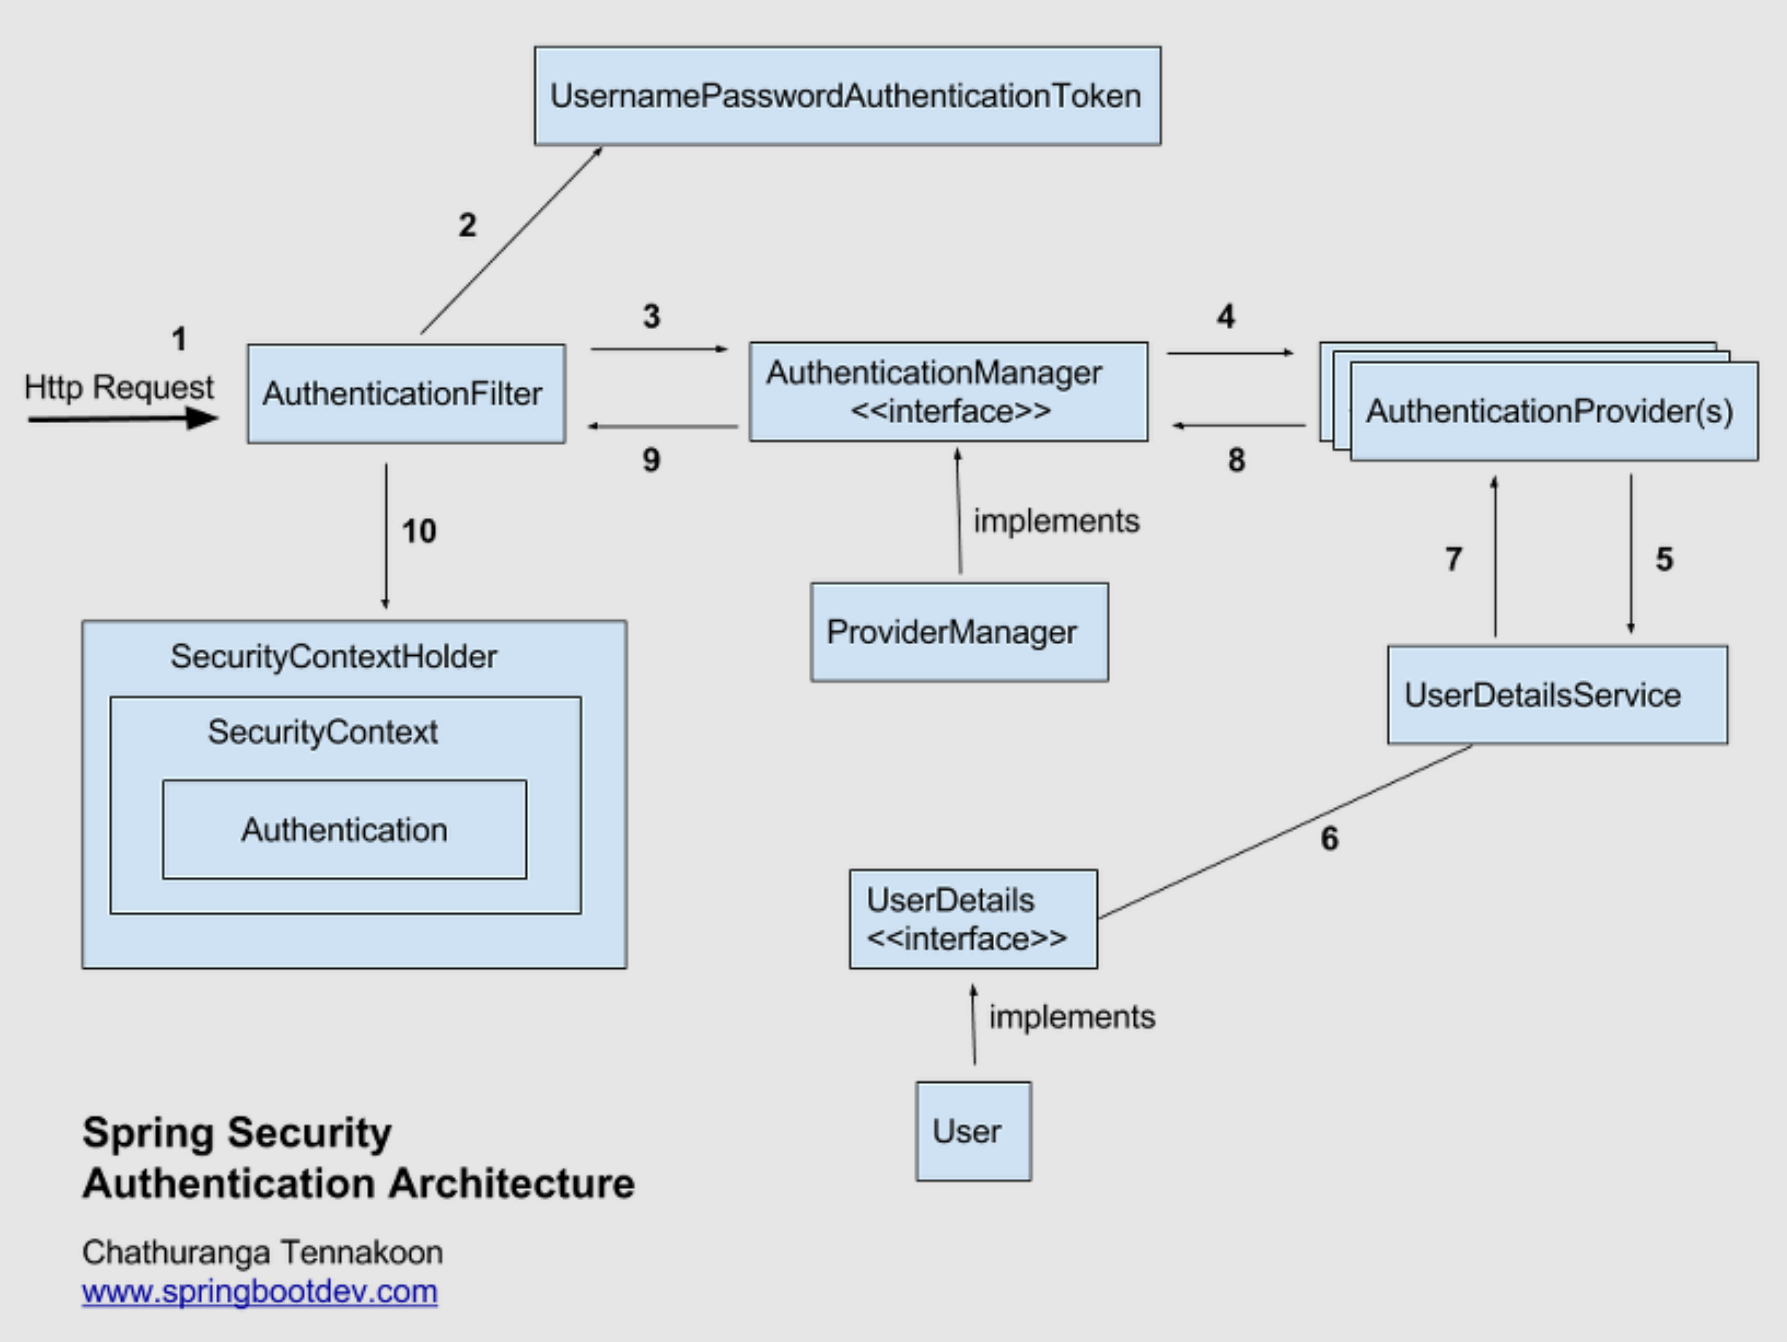
728x90
반응형

[Spring Boot] Spring Boot에서 다중 파일 업로드(Multi File Upload) 구현 가이드


[Spring Boot] Spring Boot에서 다중 파일 업로드(Multi File Upload) 구현 가이드

[Spring Boot] Spring Boot File Upload 예제 | 이미지 및 파일 업로드 구현 가이드 [Spring Boot] Spring Boot File Upload 예제 | 이미지 및 파일 업로드 구현 가이드[Spring Boot] Spring Boot에서 Interceptor 사용하기 | 설정

crushed-taro.tistory.com

1. 타임리프(Thymeleaf) 개요

1. 타임리프란?

  • 타임리프는 스프링 부트에서 공식적으로 지원하는 View 템플릿이다.

Spring Boot 사진 1

Thymeleaf는 웹 및 독립 실행형 환경 모두를 위한 최신 서버 측 Java 템플릿 엔진입니다.
Thymeleaf의 주요 목표는 귀하의 개발 워크플로에 우아하고 자연스러운 템플릿을 가져오는 것입니다.
HTML은 브라우저에 올바르게 표시될 수 있고 정적 프로토타입으로도 작동하여 개발 팀에서 보다 강력한 협업을 가능하게 합니다.
Spring Framework용 모듈, 선호하는 도구와의 통합 호스트 및 고유한 기능을 플러그인할 수 있는 기능을 갖춘 Thymeleaf는 할 수 있는 것이 훨씬 더 많지만 현대 HTML5 JVM 웹 개발에 이상적입니다.
출처 : https://www.thymeleaf.org/
 

Thymeleaf

Integrations galore Eclipse, IntelliJ IDEA, Spring, Play, even the up-and-coming Model-View-Controller API for Java EE 8. Write Thymeleaf in your favourite tools, using your favourite web-development framework. Check out our Ecosystem to see more integrati

www.thymeleaf.org


2. 타임리프의 특징

  • JSP와 달리 Thymeleaf 문서는 html 확장자를 갖고 있어 JSP처럼 Servlet이 문서를 표현하는 방식이 아니기 때문에 서버 없이도 동작 가능하다.
  • SSR 템플릿으로 백엔드에서 HTML을 동적으로 생성한다.
  • 타임리프는 스프링 부트에서 사용할 것을 권장하고 있고 스프링부트에서 JSP는 별도의 설정이 필요한 반면 타임리프는 바로 적용이 될만큼 스프링과 자연스럽게 통합할 수 있다.
  • [템플릿 엔진]: 데이터와 이 데이터들을 표현 할 템플릿을 결합해주는 도구로 스프링 부트가 지원하는 템플릿 엔진은 Thymeleaf, Freemarker, Mustache, Groovy가 있다.

출처 : https://en.wikipedia.org/wiki/Web_template_system


Web template system - Wikipedia

From Wikipedia, the free encyclopedia System in web publishing The basic process for a server-side web templating system: content (from a database), and "presentation specifications" (in a web template), are combined (through the template engine) to mass-p

en.wikipedia.org

Spring Boot 사진 2

728x90
반응형
728x90
반응형

[Spring Boot] Spring Boot File Upload 예제 | 이미지 및 파일 업로드 구현 가이드


[Spring Boot] Spring Boot File Upload 예제 | 이미지 및 파일 업로드 구현 가이드

[Spring Boot] Spring Boot에서 Interceptor 사용하기 | 설정부터 실전 예제까지 [Spring Boot] Spring Boot에서 Interceptor 사용하기 | 설정부터 실전 예제까지[Spring Boot] Spring Boot 에러 처리: @ControllerAdvice로 쉽게 관

crushed-taro.tistory.com

1. MultiFile Upload

1. 파일 업로드 뷰 페이지 작성

업로드 폼을 보여줄 뷰 페이지를 작성한다.

<form action="multi-file" method="post" encType="multipart/form-data">
  파일 : <input type="file" name="multiFiles" multiple><br>
  파일 설명 : <input type="text" name="multiFileDescription"><br>
  <input type="submit">
</form>


위 코드에서 input 태그의 multiple은 파일 여러 개를 한 번에 업로드 하기 위한 속성이다.


2. 파일 업로드를 처리할 컨트롤러 생성

업로드 파일이 같은 name 속성으로 여러 개 전달 되므로 MultipartFile클래스는 List타입으로 선언해야 한다.

@PostMapping("multi-file")
	public String multiFileUpload(@RequestParam List<MultipartFile> multiFiles, 
			String multiFileDescription, Model model) {

		System.out.println("multiFiles : " + multiFiles);
		System.out.println("multiFileDescription : " + multiFileDescription);
		
		/* 파일을 저장할 경로 설정 */
		String root = "src/main/resources/static";
		
		System.out.println("root : " + root);
		
		String filePath = root + "/uploadFiles";
		
		File dir = new File(filePath);
		if(!dir.exists()) {
			dir.mkdirs();
		}

		List<FileDTO> files = new ArrayList<>();
		
		try {
			for(MultipartFile file : multiFiles) {
				/* 파일명 변경 처리 */
				String originFileName = file.getOriginalFilename();
				String ext = originFileName.substring(originFileName.lastIndexOf("."));
				String savedName = UUID.randomUUID().toString().replace("-", "") + ext;

				/* 파일에 관한 정보 추출 후 보관 */
				files.add(new FileDTO(originFileName, savedName, filePath, 
					multiFileDescription));
				/* 파일을 저장 */
				file.transferTo(new File(filePath + "/" + savedName));
			}
			model.addAttribute("message", "파일 업로드 성공!");
		} catch (Exception e) {
			e.printStackTrace();
			
			/* 실패 시 이전에 저장 된 파일 삭제 */
			for(FileDTO file : files) {
				new File(filePath + "/" + file.getSavedName()).delete();
			}

			model.addAttribute("message", "파일 업로드 실패!!");
		} 
		
		return "result";
	}


@RequestParam어노테이션을 이용하여 요청 파라미터 중 multiFiles라는 이름으로 전송된 파일을 List<MultipartFile>객체로 받아온다. 이후 해당 파일을 처리하는데 필요한 정보를 DTO 타입을 선언해서 다룰 수 있다. 추후 DB에 저장하는 등의 작업이 필요하다. 실패 시 이전에 저장 된 파일은 삭제하며 최종적으로 result라는 뷰 페이지를 반환한다.


3. FileDTO

파일을 처리하는데 필요한 정보를 DTO 타입을 선언해서 다룰 수 있다. 추후 DB에 저장하는 등의 작업 시 활용 된다.


public class FileDTO {

    private String originFileName;
    private String savedName;
    private String filePath;
    private String fileDescription;

    public FileDTO() {
    }

    public FileDTO(String originFileName, String savedName, String filePath,
				  String fileDescription) {
        this.originFileName = originFileName;
        this.savedName = savedName;
        this.filePath = filePath;
        this.fileDescription = fileDescription;
    }

    public String getOriginFileName() {
        return originFileName;
    }

    public void setOriginFileName(String originFileName) {
        this.originFileName = originFileName;
    }

    public String getSavedName() {
        return savedName;
    }

    public void setSavedName(String savedName) {
        this.savedName = savedName;
    }

    public String getFilePath() {
        return filePath;
    }

    public void setFilePath(String filePath) {
        this.filePath = filePath;
    }

    public String getFileDescription() {
        return fileDescription;
    }

    public void setFileDescription(String fileDescription) {
        this.fileDescription = fileDescription;
    }

    @Override
    public String toString() {
        return "FileDTO{" +
                "originFileName='" + originFileName + '\'' +
                ", savedName='" + savedName + '\'' +
                ", filePath='" + filePath + '\'' +
                ", fileDescription='" + fileDescription + '\'' +
                '}';
    }

}


4. 반환 뷰 페이지

이전 테스트와 동일한 반환 뷰 페이지를 사용한다.


<!doctype html>
<html lang="en">
<head>
    <meta charset="UTF-8">
    <title>result</title>
</head>
<body>
    <h1 th:text="${ message }"></h1>
</body>
</html>


지정된 경로에 파일이 업로드 되는 것을 확인할 수 있다.

728x90
반응형
728x90
반응형

[Spring Boot] Spring Boot에서 Interceptor 사용하기 | 설정부터 실전 예제까지


[Spring Boot] Spring Boot에서 Interceptor 사용하기 | 설정부터 실전 예제까지

[Spring Boot] Spring Boot 에러 처리: @ControllerAdvice로 쉽게 관리하기 [Spring Boot] Spring Boot 에러 처리: @ControllerAdvice로 쉽게 관리하기[Spring Boot] Spring Boot 에러 처리: @ExceptionHandler로 쉽게 관리하기 [Spring Boo

crushed-taro.tistory.com

1. Single File Upload

1. application.properties

spring-boot-starter-web에는 file upload를 위한 multipartResolver 가 기본 빈으로 등록 되어 있기 때문에 추가적으로 등록할 필요는 없다. 파일 저장 경로, 용량 등에 대한 설정을 application.properties를 이용해서 할 수 있다.


파일의 크기가 fize-size-threshold 값 이하라면 임시파일을 생성하지 않고 메모리에서 즉시 파일을 읽어서 생성할 수 있다. 속도는 빠르지만 쓰레드가 작업을 수행하는 동안 부담이 될 수 있다.


파일의 크기가 fize-size-threshold 값을 초과한다면 파일은 spring.servlet.multipart.location 경로에 저장되어 해당 파일을 읽어서 작업을 하도록 되어있다. 이 예제에서는 프로젝트 내부 경로에 업로드 파일을 저장하려고 하니 프로젝트 절대 경로를 파일 저장 경로로 설정한다.


# 파일 저장 경로
spring.servlet.multipart.location=프로젝트절대경로

# 최대 업로드 파일 크기
spring.servlet.multipart.max-file-size=10MB

# 최대 요청 파일 크기
spring.servlet.multipart.max-request-size=10MB


2. 파일 업로드 뷰 페이지 작성

업로드 폼을 보여줄 뷰 페이지를 작성한다. 


<form action="single-file" method="post" encType="multipart/form-data">
	파일 : <input type="file" name="singleFile"><br>
  파일 설명 : <input type="text" name="singleFileDescription"><br>
  <input type="submit">
</form>


위 코드에서 enctype="multipart/form-data"는 파일 업로드를 위한 인코딩 타입을 지정하는 속성이다.


3. 파일 업로드를 처리할 컨트롤러 생성


Spring Framework에서는 MultipartFile클래스를 이용하여 파일 업로드를 처리한다. 이를 처리할 컨트롤러를 생성한다.


@PostMapping("single-file")
public String singleFileUpload(@RequestParam MultipartFile singleFile, 
		String singleFileDescription, Model model) {
		
		System.out.println("singleFile : " + singleFile);
		System.out.println("singleFileDescription : " + singleFileDescription);
		
		/* 파일을 저장할 경로 설정 */
		String root = "src/main/resources/static";
		String filePath = root + "/uploadFiles";
		
		File dir = new File(filePath);
		System.out.println(dir.getAbsolutePath());

		if(!dir.exists()) {
			dir.mkdirs();
		}
		
		/* 파일명 변경 처리 */
		String originFileName = singleFile.getOriginalFilename();
		String ext = originFileName.substring(originFileName.lastIndexOf("."));
		String savedName = UUID.randomUUID().toString().replace("-", "") + ext;
		
		/* 파일을 저장 */
		try {
			singleFile.transferTo(new File(filePath + "/" + savedName));
			model.addAttribute("message", "파일 업로드 성공!");
		} catch (Exception e) {
			e.printStackTrace();
			model.addAttribute("message", "파일 업로드 실패!!");
		} 
		
		return "result";
	}


@RequestParam어노테이션을 이용하여 요청 파라미터 중 singleFile이라는 이름으로 전송된 파일을 MultipartFile객체로 받아온다. 이후 해당 파일을 리네임 처리하여 저장하고, result라는 뷰 페이지를 반환한다.


4. 반환 뷰 페이지 작성

<!doctype html>
<html lang="en">
<head>
    <meta charset="UTF-8">
    <title>result</title>
</head>
<body>
    <h1 th:text="${ message }"></h1>
</body>
</html>


지정된 경로에 파일이 업로드 되는 것을 확인할 수 있다.

728x90
반응형
728x90
반응형

[Spring Boot] Spring Boot 에러 처리: @ControllerAdvice로 쉽게 관리하기


[Spring Boot] Spring Boot 에러 처리: @ControllerAdvice로 쉽게 관리하기

[Spring Boot] Spring Boot 에러 처리: @ExceptionHandler로 쉽게 관리하기 [Spring Boot] Spring Boot 에러 처리: @ExceptionHandler로 쉽게 관리하기[Spring Boot] Spring Boot Controller에서 ModelAndView 반환과 동작 원리 [Spring Boot]

crushed-taro.tistory.com

1. Interceptor

1. Spring Interceptor란?

Spring Interceptor는 Spring 프레임워크에서 제공하는 기능 중 하나로, 클라이언트의 요청을 가로채서 처리하는 역할을 한다. 이를 통해 공통적인 로직(로깅, 성능 측정, 캐싱)을 처리하거나, 보안(인증, 권한) 등의 목적으로 특정 조건을 검사하고 해당 요청을 처리하거나, 무시할 수 있다.


Interceptor는 특정 요청 URL에만 적용되도록 매핑할 수 있다는 점이 필터와 유사하다. 하지만 필터와 달리 
Interceptor는 스프링 웹 애플리케이션 컨텍스트에 구성하기 때문에 컨테이너의 기능을 자유롭게 활용할 수 있으며 그 내부에 선언된 모든 빈을 참조할 수 있다. 


1. Spring MVC request life cycle

Spring 사진 1
Spring 사진 2


2. Interceptor 적용하기

Interceptor를 이용해서 handler의 수행 시간을 측정하는 테스트를 진행한다.

클라이언트 측에서 수행 시간을 확인하는 요청을 보낸다.


<button onclick="location.href='stopwatch'">수행 시간 확인하기</button>


컨트롤러의 핸들러 메소드에서 무언가 수행하는 상황을 상정하기 위해 Thread.sleep(밀리세컨)를 사용하여 잠시 멈추었다가 진행되도록 한다.


@GetMapping("stopwatch")
public String handlerMethod() throws InterruptedException {
		
	System.out.println("핸들러 메소드 호출함...");
	/* 아무 것도 하는 일이 없으니 수행시간이 0으로 나올 수 있어서 Thread.sleep(1000) 호출 */
	Thread.sleep(1000);
		
	return "result";
}


핸들러로 가는 요청을 가로챌 Interceptor를 작성한다. Interceptor는HandlerInterceptor 인터페이스를 구현하여 개발할 수 있으며, preHandle()postHandle()afterCompletion() 등의 메소드를 오버라이드하여 사용한다. preHandle() 메소드는 컨트롤러 실행 전, postHandle() 메소드는 컨트롤러 실행 후, afterCompletion() 메소드는 뷰가 렌더링 된 후 호출된다.


@Component
public class StopWatchInterceptor implements HandlerInterceptor {
	
	private final MenuService menuService;

	/* 인터셉터는 스프링 컨테이너에 존재하는 빈을 의존성 주입 받을 수 있다. */
	public StopWatchInterceptor(MenuService menuService) {
		this.menuService = menuService;
	}
	
	/* 전처리 메소드로 메소드 실행 시작 시간을 request에 attribute로 저장한다. */
	@Override
	public boolean preHandle(HttpServletRequest request, HttpServletResponse response, 
			Object handler) throws Exception {
		
		System.out.println("preHandler 호출함...");
		
		long startTime = System.currentTimeMillis();
		
		request.setAttribute("startTime", startTime);
		
		/* true이면 컨트롤러를 이어서 호출한다. false이면 핸들러 메소드를 호출하지 않는다. */
		return true;
	}
	
	/* 후처리 메소드로 메소드 실행 종료 시간을 구해 실행 시작 시간과 연산하여 걸린 시간을 계산한다. */
	@Override
	public void postHandle(HttpServletRequest request, HttpServletResponse response, 
			Object handler, @Nullable ModelAndView modelAndView) throws Exception {
		
		System.out.println("postHandler 호출함...");
		
		long startTime = (Long) request.getAttribute("startTime");
		request.removeAttribute("startTime");
		
		long endTime = System.currentTimeMillis();
		
		modelAndView.addObject("interval", endTime - startTime);
	}
	
	/* 뷰가 렌더링 된 후 호출하는 메소드 */
	public void afterCompletion(HttpServletRequest request, HttpServletResponse response, 
			Object handler, @Nullable Exception ex) throws Exception {
		
		System.out.println("afterComplate 호출함...");
		
		menuService.method();
	}
	
}


MenuService는 의존성 주입 테스트를 위해 작성하는 클래스이다.


@Service
public class MenuService {
	
	public void method() {
		System.out.println("메소드 호출 확인");
	}
	
}


응답할 뷰는 아래와 같이 작성하여 메소드 호출 수행시간을 출력해본다.


<!doctype html>
<html lang="en">
<head>
    <meta charset="UTF-8">
    <title>result</title>
</head>
<body>
    <h1 th:text="|메소드 호출 수행 시간 : ${ interval } (ms)|"></h1>
</body>
</html>


Interceptor를 사용하려면, WebMvcConfigurer 인터페이스를 구현하는 설정 클래스를 만들고 addInterceptors() 메소드를 오버라이드하여 등록해야 한다. 이 때 등록 순서에 따라 Interceptor가 실행되는 순서가 결정된다.


@Configuration
public class WebConfiguration implements WebMvcConfigurer {

		@Autowired
    private StopWatchInterceptor stopWatchInterceptor;

    @Override
    public void addInterceptors(InterceptorRegistry registry) {

        registry.addInterceptor(stopWatchInterceptor)
                .addPathPatterns("/stopwatch");
    }
}


로그와 결과 화면을 통해 Interceptor가 잘 적용 되었음을 확인할 수 있다.


만약 모든 요청에 대해서 인터셉터를 적용하고 싶다면 아래와 같이 적용할 수 있다. 정적 리소스 또는 에러 포워딩 경로 등은 excluedPathPatterns 메서드를 통해 제외해주면 된다.


@Configuration
public class WebConfiguration implements WebMvcConfigurer {

		@Autowired
    private StopWatchInterceptor stopWatchInterceptor;

    @Override
    public void addInterceptors(InterceptorRegistry registry) {

        registry.addInterceptor(stopWatchInterceptor)
                .addPathPatterns("/*")
                /* static 하위의 정적 리소스는 인터셉터가 적용되지 않도록 한다. */
                .excludePathPatterns("/css/**")
                .excludePathPatterns("/images/**")
                .excludePathPatterns("/js/**")
                /* /error 로 포워딩 되는 경로도 제외해주어야 한다. */
                .excludePathPatterns("/error");
    }
}
728x90
반응형
728x90
반응형

[Spring Boot] Spring Boot 에러 처리: @ExceptionHandler로 쉽게 관리하기


[Spring Boot] Spring Boot 에러 처리: @ExceptionHandler로 쉽게 관리하기

[Spring Boot] Spring Boot Controller에서 ModelAndView 반환과 동작 원리 [Spring Boot] Spring Boot Controller에서 ModelAndView 반환과 동작 원리[Spring Boot] Spring Boot View Resolver에서 String 반환의 의미와 동작 원리 [Spring Bo

crushed-taro.tistory.com

1.Exception Handler 테스트

1. @ControllerAdvice

@ControllerAdvice 어노테이션은 스프링에서 예외 처리를 담당하는 어노테이션이다. 
@ControllerAdvice 어노테이션이 붙은 클래스는 전역 예외 처리를 담당하게 된다. 즉, 여러 개의 컨트롤러에서 발생하는 예외를 일괄적으로 처리하기 위해 사용한다. 이 어노테이션을 사용하면 모든 컨트롤러에서 발생하는 예외를 한 곳에서 처리할 수 있어 코드의 중복을 방지할 수 있다.


=> @ControllerAdvice 어노테이션을 사용하면 전역 예외 처리를 할 수 있다는 장점이 있지만, 이 어노테이션을 사용하면서 주의해야 할 점도 있다. @ControllerAdvice 어노테이션이 붙은 클래스는 컨트롤러에서 발생하는 모든 예외를 처리하게 되므로, 예외 처리에 대한 로직이 많아지면 클래스의 크기가 커질 수 있다. 따라서 이를 방지하기 위해서는 역할에 따라 클래스를 나눠야 한다.


1. 기본 에러 화면


클라이언트에서 다음과 같은 버튼 클릭 이벤트를 통해 요청한다.


<button onclick="location.href='other-controller-null'">
	NullPointerException 테스트
</button>
<button onclick="location.href='other-controller-user'">
	사용자 정의 Exception 테스트
</button>


새로운 Controller 클래스를 만들어 위의 요청과 연결하고 다시 한 번 컨트롤러의 핸들러 메소드에 의도적으로 NullPointerException

과, 사용자 정의 Exception인 MemberRegistException을 발생시키는 코드를 작성한다.


@GetMapping("other-controller-null")
public String otherNullPointerExceptionTest() {
		
	String str = null;
	System.out.println(str.charAt(0));
		
	return "/";
}
@GetMapping("other-controller-user")
public String otherUserExceptionTest() throws MemberRegistException {
		
	boolean check = true;
	if(check) {
		throw new MemberRegistException("당신 같은 사람은 회원으로 받을 수 없습니다!");
	}
		
	return "/";
}


이전의 Controller 클래스에 작성 했던 @ExceptionHandler 어노테이션이 붙은 메소드는 동작하지 않는다. 따라서 기본 에러 응답 화면을 확인할 수 있다.


2. Global 레벨의 Exception 처리


별도의 클래스에 @ControllerAdvice 어노테이션을 붙이고 @ExceptionHandler 노테이션을 붙인 메소드를 정의한다.


@ExceptionHandler(NullPointerException.class)
public String nullPointerExceptionHandler(NullPointerException exception) {

	System.out.println("Global 레벨의 exception 처리");

	return "error/nullPointer";
}
@ExceptionHandler(MemberRegistException.class)
public String userExceptionHandler(Model model, MemberRegistException exception) {

	System.out.println("Global 레벨의 exception 처리");
	model.addAttribute("exception", exception);

	return "error/memberRegist";
}


Controller 클래스 내에 Exception Handler 설정이 없을 때@ControllerAdvice 클래스에서 전역으로 설정 된 Exception Handler가 동작한다는 것을 확인할 수 있다.


3. 상위 타입으로 default 처리


클라이언트에서 다음과 같은 버튼 클릭 이벤트를 통해 요청한다.


<button onclick="location.href='other-controller-array'">ArrayException 테스트</button>


컨트롤러의 핸들러 메소드에 의도적으로 ArrayIndexOutOfBoundsException을 발생시키는 코드를 작성한다.


@GetMapping("other-controller-array")
public String otherArrayExceptionTest() {

    double[] array = new double[0];
    System.out.println(array[0]);

    return "/";
}


그리@ControllerAdvice가 선언된 클래스에 Exception 타입을 트랩하는 Exception Handler method를 작성한다.


@ExceptionHandler(Exception.class)
public String defaultExceptionHandler(Exception exception) {

    return "error/default";
}


에러 뷰는 다음과 같이 작성한다.


<!DOCTYPE html>
<html lang="en">
<head>
    <meta charset="UTF-8">
    <title>default</title>
</head>
<body>
    <h1>뭔가 에러가 발생함</h1>
</body>
</html>


상위 타입인 Exception을 이용하면 구체적으로 작성하지 않은 타입의 에러가 발생하더라도 처리가 가능하므로 default 처리 용도로 사용할 수 있다.


3. ResponseStatusExceptionResolver

ResponseStatusExceptionResolver는 @ExceptionHandler 어노테이션과 함께 사용할 수 있다. 구체적인 응답 코드를 지정할 수 있어 404나 500과 같은 HTTP 상태 코드를 반환할 수 있다. 


다음은 ResponseStatusExceptionResolver 사용 예시 코드이다.


@ResponseStatus(value = HttpStatus.FORBIDDEN, reason = "Permission Denied")
@ExceptionHandler(value=DeniedUserException.class)
public String handleDeniedUserException(DeniedUserException e) {
    
    return "/error/403";
}


4. SimpleMappingExceptionResolver

SimpleMappingExceptionResolver는 예외 타입별로 예외 처리 페이지를 매핑해주는 방식을 제공한다. 


예외 타입과 예외 처리 페이지를 매핑하기 위해서는 setExceptionMappings 메소드를 사용한다. 이 메소드는 Properties 타입의 객체를 인자로 받는다. Properties 객체의 키는 예외 타입, 값은 예외 처리 페이지의 뷰 이름이다.

또한, defaultErrorView 프로퍼티를 이용해 예외 처리 페이지가 명시되어 있지 않은 예외에 대한 기본 처리 페이지를 설정할 수 있다.

다음은 SimpleMappingExceptionResolver 사용 예시 코드이다.


@Configuration
public class RootConfiguration {

    @Bean
    public SimpleMappingExceptionResolver simpleMappingExceptionResolver() {

        SimpleMappingExceptionResolver exceptionResolver = new SimpleMappingExceptionResolver();

        Properties props = new Properties();
        props.setProperty("java.lang.NullPointerException", "error/nullPointer");
        props.setProperty("MemberRegistException", "error/memberRegist");

        exceptionResolver.setExceptionMappings(props);
        exceptionResolver.setDefaultErrorView("error/default");

        return exceptionResolver;
    }
}
728x90
반응형
728x90
반응형

[Spring Boot] Spring Boot Controller에서 ModelAndView 반환과 동작 원리


[Spring Boot] Spring Boot Controller에서 ModelAndView 반환과 동작 원리

[Spring Boot] Spring Boot View Resolver에서 String 반환의 의미와 동작 원리 [Spring Boot] Spring Boot View Resolver에서 String 반환의 의미와 동작 원리[Spring Boot] Spring Boot @RequestBody 완벽 가이드: Handler Method에서 JSON

crushed-taro.tistory.com

1. Exception Handler

Exception Handler란, 프로그램이 실행 중에 예기치 않은 오류가 발생했을 때 이를 처리하는 메커니즘이다. 스프링 MVC에서는 예외 처리를 관리하는 기능을 여러가지 제공하고 있다. 


1. Handler Exceptino Resolver

HandlerExceptionResolver는 스프링에서 예외를 처리하는 방법 중 하나이다. DispatcherServlet이 예외가 발생했을 때, HandlerExceptionResolver를 이용해 예외를 처리할 수 있다.


종류

  • SimpleMappingExceptionResolver
  • DefaultHandlerExceptionResolver
  • ResponseStatusExceptionResolver
  • ExceptionHandlerExceptionResolver


방식

  • SimpleMappingExceptionResolver
    • 예외 타입별로 예외 처리 페이지를 매핑해준다.
  • DefaultHandlerExceptionResolver
    • 기본 예외 처리 방식을 제공한다.
  • ResponseStatusExceptionResolver
    • 예외 발생 시 HTTP 상태 코드를 반환한다.
  • ExceptionHandlerExceptionResolver
    • @ExceptionHandler 어노테이션을 이용해서 컨트롤러 내부에서 예외를 처리할 수 있다.


2. Exception Handler 테스트

1. @ExceptionHandler

@ExceptionHandler
는 스프링 MVC에서 예외 처리를 담당하는 어노테이션으로, Controller 클래스 내에서 예외가 발생했을 때 해당 예외를 처리할 메서드를 정의하는 데 사용된다.


1. 기본 에러 화면


클라이언트에서 다음과 같은 버튼 클릭 이벤트를 통해 요청한다.

<button onclick="location.href='controller-null'">NullPointerException 테스트</button>
<button onclick="location.href='controller-user'">사용자 정의 Exception 테스트</button>


컨트롤러의 핸들러 메소드에 의도적으로 NullPointerException과, 사용자 정의 Exception인 MemberRegistException을 발생시키는 코드를 작성한다.

@GetMapping("controller-null")
public String nullPointerExceptionTest() {
		
	String str = null;
	System.out.println(str.charAt(0));
		
	return "/";
}
@GetMapping("controller-user")
public String userExceptionTest() throws MemberRegistException {
		
	boolean check = true;
	if(check) {
		throw new MemberRegistException("당신 같은 사람은 회원으로 받을 수 없습니다!");
	}
		
	return "/";
}


Exception Handling이 되어 있지 않아 기본 화면으로 오류 화면이 응답된다.


2. Controller 레벨의 Exception 처리


동일 클래스에 아래와 같은 @ExceptionHandler노테이션이 붙은 메소드를 정의하고 응답할 뷰도 작성한다.

@ExceptionHandler(NullPointerException.class)
public String nullPointerExceptionHandler(NullPointerException exception) {

	System.out.println("controller 레벨의 exception 처리");

	return "error/nullPointer";
}
<!doctype html>
<html lang="en">
<head>
    <meta charset="UTF-8">
    <title>nullPointer</title>
</head>
<body>
    <h1>널 위하여 NullPointerException 발생함!</h1>
</body>
</html>
@ExceptionHandler(MemberRegistException.class)
public String userExceptionHandler(Model model, MemberRegistException exception) {

	System.out.println("controller 레벨의 exception 처리");
	model.addAttribute("exception", exception);

	return "error/memberRegist";
}
<!DOCTYPE html>
<html lang="en">
<head>
    <meta charset="UTF-8">
    <title>memberRegist</title>
</head>
<body>
    <h1 th:text="${ exception.message }"></h1>
</body>
</html>


해당 Controller 범위에서 해당하는 Exception이 발생했을 때 그 Exception이 설정 된 메소드가 실행 된다.

이처럼 @ExceptionHandler 어노테이션을 통해 Controller의 메소드에서 throw된 Exception에 대한 공통적인 처리를 할 수 있도록 지원하고 있다.

728x90
반응형
728x90
반응형

[Spring Boot] Spring Boot View Resolver에서 String 반환의 의미와 동작 원리


[Spring Boot] Spring Boot View Resolver에서 String 반환의 의미와 동작 원리

[Spring Boot] Spring Boot @RequestBody 완벽 가이드: Handler Method에서 JSON 요청 처리하기 [Spring Boot] Spring Boot @RequestBody 완벽 가이드: Handler Method에서 JSON 요청 처리하기[Spring Boot] Spring Boot HttpSession 사용법 총

crushed-taro.tistory.com

1. View Resolver

1. ModelAndView 타입으로 반환

ModelAndView 타입으로 반환하는 경우, 모델과 뷰 정보를 한 번에 담아서 반환하게 된다. String과 ModelAndView는 모두 forward와 redirect를 사용할 수 있다. ModelAndView를 사용한 redirect 시 RedirectAttributes사용도 동일하게 가능하다.
 

1. view name 반환(forward)


GET 방식의 /modelandview요청을 전달한다.

<h3>ModelAndView로 뷰 이름 지정해서 반환하기</h3>
<button onclick="location.href='modelandview'">ModelAndView로 뷰 이름 지정해서 반환받기</button>


발생하는 요청을 매핑할 controller의 handler method이다.


ModelAndView 타입은 모델과 뷰를 합친 개념이다. 핸들러 어댑터가 핸들러 메소드를 호출하고 반환받은 문자열을 ModelAndView로 만들어 dispatcherServlet에 반환한다. 이 때 문자열을 반환해도 되지만 ModelAndView를 미리 만들어서 반환할 수 도 있다.

@GetMapping("modelandview")
public ModelAndView modelAndViewReturning(ModelAndView mv) {

	mv.addObject("forwardMessage", "ModelAndView를 이용한 모델과 뷰 반환");
	mv.setViewName("result");
		
	return mv;
}


응답할 뷰에서는 model에 추가 된 forwardMessage를 화면에 출력하도록 한다


view resolver가 올바르게 동작하였음을 응답 화면을 통해 확인할 수 있다.


2. redirect


GET 방식의 /modelandview-redirect요청을 전달한다.
<h3>ModelAndView로 redirect 하기</h3>
<button onclick="location.href='modelandview-redirect'">ModelAndView로 뷰 이름 반환하여 리다이렉트</button>


발생하는 요청을 매핑할 controller의 handler method이다. ModelAndView 객체에서도 동일하게 접두사로 redirect:를 붙이면 forward 되지 않고 redirect 된다.

@GetMapping("modelandview-redirect")
public ModelAndView modelAndViewRedirect(ModelAndView mv)  {
		
	mv.setViewName("redirect:/");
		
	return mv;
}


버튼 클릭 시 / 경로로 리다이렉트 되는 것을 확인할 수 있다.


3. RedirectAttributes


GET 방식의 /modelandview-redirect-attr 요청을 전달한다.

<h3>ModelAndView로 뷰 이름 반환하면서 flashAttribute 추가 하기</h3>
<button onclick="location.href='modelandview-redirect-attr'">
	ModelAndView로 뷰 이름 반환하여 리다이렉트
</button>


발생하는 요청을 매핑할 controller의 handler method이다.


ModelAndView 사용시에도 동일하게 RedirectAttributes 타입을 통해 redirect 시 속성 값을 저장할 수 있다.

@GetMapping("modelandview-redirect-attr")
public ModelAndView modelAndViewRedirect(ModelAndView mv, RedirectAttributes rttr) {
		
	rttr.addFlashAttribute("flashMessage2", "ModelAndview를 이용한 redirect attr");
	mv.setViewName("redirect:/");
		
	return mv;
}


응답 시 requestScope에 보존flashMessage2을 꺼내 alert 창에 띄운다.

<script>
    const flashMessage2 = '[[${ flashMessage2 }]]';
    console.log(flashMessage2);
    if(flashMessage2) {
       alert(flashMessage2);
    }
</script>


redirect 했지만 메세지가 잘 보존 되었음을 alert 창의 메세지를 통해 확인할 수 있다.

728x90
반응형
728x90
반응형

[Spring Boot] Spring Boot @RequestBody 완벽 가이드: Handler Method에서 JSON 요청 처리하기


[Spring Boot] Spring Boot @RequestBody 완벽 가이드: Handler Method에서 JSON 요청 처리하기

[Spring Boot] Spring Boot HttpSession 사용법 총정리 - Handler Method에서 세션 데이터 관리하기 [Spring Boot] Spring Boot HttpSession 사용법 총정리 - Handler Method에서 세션 데이터 관리하기[Spring Boot] Spring Boot @ModelAtt

crushed-taro.tistory.com

1. View Resolver

View Resolver 사진 1


핸들러 메소드가 요청을 처리하고 논리 뷰 이름을 반환하면 DispatcherServlet은 화면에서 데이터를 표시하도록 뷰 템플릿에 제어권을 넘긴다. 스프링 MVC에서는 다양한 전략에 맞게 뷰를 해석할 수 있는 ViewResolver 구현체 몇 가지가 있다.


그 중 MVC 기본 설정에는 템플릿 명과 위치에 따른 뷰를 해석하는 InternalResourceViewResolver를 기본으로 사용하고 있다.


prefix/suffix를 이용해 뷰 이름을 특정 애플리케이션 디렉터리에 대응시킨다. InternalResourceViewResolver는 사용이 간단해서 좋기는 하지만 RequestDispatcher가 forward할 수 있는 내부 리소스(jsp또는 서블릿)만 해석이 가능하기 때문에, 다른 뷰 템플릿을 사용하는 경우에는 다른 viewResolver를 사용해야 한다.


타임리프 또한 동일한 방식의 뷰 리졸버인 ThymeleafViewResolver를 사용한다. 다만 prefix가 resources/templates/ 이고 suffix가 .html 이다.


1. String 타입으로 반환

1. view name 반환(forward)


GET 방식의 /string요청을 전달한다.

<h3>문자열로 뷰 이름 반환하기</h3>
<button onclick="location.href='string'">문자열로 뷰 이름 반환</button>


발생하는 요청을 매핑할 controller의 handler method이다. 

@GetMapping("string")
public String stringReturning(Model model) {
		
	model.addAttribute("forwardMessage", "문자열로 뷰 이름 반환함...");
	
	return "result";
}


문자열로 뷰 이름을 반환한다는 것은 반환 후 ThymeleafViewResolver에게  resources/templates/  prefix로 .html  suffix로 하여 resources/templates/result.html 파일을 응답 뷰로 설정하라는 의미가 된다.


응답할 뷰에서는 model에 추가 된 forwardMessage를 화면에 출력하도록 한다.

<!doctype html>
<html lang="en">
<head>
    <meta charset="UTF-8">
    <title>result</title>
</head>
<body>
    <h1 th:text="${ forwardMessage }"></h1>
</body>
</html>


view resolver가 올바르게 동작하였음을 응답 화면을 통해 확인할 수 있다.


2. redirect


GET 방식의 /string-redirect 요청을 전달한다.

<h3>문자열로 redirect 하기</h3>
<button onclick="location.href='string-redirect'">문자열로 뷰 이름 반환하여 리다이렉트</button>


발생하는 요청을 매핑할 controller의 handler method이다. 동일하게 String 반환 값을 사용하지만 접두사로 redirect:를 붙이면 forward 되지 않고 redirect 된다.

@GetMapping("string-redirect")
public String stringRedirect()  {
		
	return "redirect:/";
}


버튼 클릭 시 / 경로로 리다이렉트 되는 것을 확인할 수 있다.


3. RedirectAttributes


GET 방식의 /string-redirect-attr 청을 전달한다.

<h3>문자열로 뷰 이름 반환하면서 flashAttribute 추가 하기</h3>
<button onclick="location.href='string-redirect-attr'">
	문자열로 뷰 이름 반환하여 리다이렉트 & flashAttr 사용하기
</button>


발생하는 요청을 매핑할 controller의 handler method이다.


기본적으로 redirect시에는 재요청이 발생하므로 request scope는 소멸된다. 하지만 스프링에서는 RedirectAttributes 타입을 통해 redirect 시 속성 값을 저장할 수 있도록 하는 기능을 제공한다. 리다이렉트 시 flash 영역에 담아서 redirect 할 수 있다. 자동으로 모델에 추가되기 때문에 requestScope에서 값을 꺼내면 된다. 세션에 임시로 값을 담고 소멸하는 방식이기 때문에 session에 동일한 키 값이 존재하지 않아야 한다.


@GetMapping("string-redirect-attr")
public String stringRedirectFlashAttribute(RedirectAttributes rttr) {

		rttr.addFlashAttribute("flashMessage1", "리다이렉트 attr 사용하여 redirect..");
		
		return "redirect:/";
	}


응답 시 requestScope에 보존 된 flashMessage1을 꺼내 alert 창에 띄운다.

<script>
    const flashMessage1 = '[[${ flashMessage1 }]]';
    console.log(flashMessage1);
    if(flashMessage1) {
       alert(flashMessage1);
    }
</script>


redirect 했지만 메세지가 잘 보존 되었음을 alert 창의 메세지를 통해 확인할 수 있다.

728x90
반응형
728x90
반응형

[Spring Boot] Spring Boot HttpSession 사용법 총정리 - Handler Method에서 세션 데이터 관리하기


[Spring Boot] Spring Boot HttpSession 사용법 총정리 - Handler Method에서 세션 데이터 관리하기

[Spring Boot] Spring Boot @ModelAttribute 완벽 가이드 - Handler Method에서 데이터 바인딩 마스터하기 [Spring Boot] Spring Boot @ModelAttribute 완벽 가이드 - Handler Method에서 데이터 바인딩 마스터하기[Spring Boot] Spring

crushed-taro.tistory.com

1. Handler Method

1. @RequestBody

index.html에서 GET 방식의 /first/body요청을 전달한다.

<h3>5. @RequestBody를 이용하여 파라미터 전달 받기</h3>
<button onclick="location.href='/first/body'">@RequestBody 이용하기</button>


Controller 클래스의 핸들러 메소드를 통해 파라미터 전달 테스트를 위해 값을 입력할 수 있는 뷰를 응답한다.

@Controller
@RequestMapping("/first/*")
public class FirstController {

	@GetMapping("body")
	public void body() {}

	...생략

}


resources/templates/first의 하위에 body.html파일을 생성한다.
<!doctype html>
<html lang="en">
<head>
    <meta charset="UTF-8">
    <title>body</title>
</head>
<body>
    <h1>@RequestBody를 이용한 커맨드객체로 파라미터 값 전달받기</h1>

    <form action="body" method="post">
        메뉴 이름 : <input type="text" name="name"><br>
        메뉴 가격 : <input type="number" name="price"><br>
        카테고리 :
        <select name="categoryCode">
            <option value="1">식사</option>
            <option value="2">음료</option>
            <option value="3">디저트</option>
        </select><br>
        판매 상태 : <input type="text" name="orderableStatus"><br>
        <input type="submit" value="검색하기">
    </form>
</body>
</html>


해당 화면에서 사용자 입력 양식에 값을 입력하고 submit 을 누르면 POST 방식의 /first/body요청이 발생한다.


발생하는 요청을 매핑할 controller의 handler method이다.

@RequestBody 어노테이션은 http 본문 자체를 읽는 부분을 모델로 변환시켜 주는 어노테이션이다.

출력해보면 쿼리스트링 형태의 문자열이 전송된다.

JSON으로 전달하는 경우 Jackson의 컨버터로 자동 파싱하여 사용할 수 있다.

주로 RestAPI 작성 시 많이 사용되며, 일반적인 form 전송을 할 때는 거의 사용하지 않는다.

추가적으로 헤더에 대한 정보도 @RequestHeader 어노테이션을 이용해서 가져올 수 있다. @CookieValue를 이용해서 쿠키 정보도 쉽게 불러올 수 있다.

@PostMapping("body")
	public void bodyTest(@RequestBody String body,
			@RequestHeader("content-type") String contentType, 
			@CookieValue(value="JSESSIONID", required = false) String sessionId) {
		
		System.out.println(contentType);
		System.out.println(sessionId);
		System.out.println(body);
		System.out.println(URLDecoder.decode(body));
	}


클라이언트에서 입력 된 값이 @RequestBody어노테이션을 설정한 값으로 잘 전달 되었음을 콘솔 출력을 통해 확인할 수 있다.

728x90
반응형
728x90
반응형

[Spring Boot] Spring Boot @ModelAttribute 완벽 가이드 - Handler Method에서 데이터 바인딩 마스터하기


[Spring Boot] Spring Boot @ModelAttribute 완벽 가이드 - Handler Method에서 데이터 바인딩 마스터하기

[Spring Boot] Spring Boot @RequestParam 완벽 가이드: HTTP 요청 파라미터 처리하기 [Spring Boot] Spring Boot @RequestParam 완벽 가이드: HTTP 요청 파라미터 처리하기[Spring Boot] Spring Boot Handler Method의 WebRequest 파라미

crushed-taro.tistory.com

1. Handler Method

1. HttpSession

index.html에GET 방식의 /first/login요청을 전달한다.

<h3>4-1, 4-2. HttpSession 이용하기</h3>
<button onclick="location.href='/first/login'">session에 정보 담기</button>


Controller 클래스의 핸들러 메소드를 통해 파라미터 전달 테스트를 위해 값을 입력할 수 있는 뷰를 응답한다.

@Controller
@RequestMapping("/first/*")
public class FirstController {

	@GetMapping("login")
	public void login() {}

	...생략

}


resources/templates/first 의 하위에 login.html파일을 생성한다.
<!doctype html>
<html lang="en">
<head>
    <meta charset="UTF-8">
    <title>login</title>
</head>
<body>
    <h1>Session 이용하기</h1>

    <h3>HttpSession을 매개변수로 선언하기</h3>
    <form action="login1" method="post">
        ID : <input type="text" name="id"><br>
        PWD : <input type="password" name="pwd"><br>
        <input type="submit" value="로그인">
    </form>
</body>
</html>


해당 화면에서 사용자 입력 양식에 값을 입력하고 submit 을 누르면 POST 방식의 /first/login1요청이 발생한다.


발생하는 요청을 매핑할 controller의 handler method이다.

HttpSession을 매개변수로 선언하면 핸들러 메소드 호출 시 세션 객체를 넣어서 호출한다.

@PostMapping("login1")
public String sessionTest1(HttpSession session, @RequestParam String id) {
		
	session.setAttribute("id", id);

	return "first/loginResult";
}


resources/templates/first 의 하위에 loginResult.html파일을 생성한다.
<!doctype html>
<html lang="en">
<head>
    <meta charset="UTF-8">
    <title>loginResult</title>
</head>
<body>
    <h1>Session에 담긴 값 확인하기</h1>
    <h3 th:text="|${ session.id }님 환영합니다.|"></h3>
    <div>
        <button onclick="location.href='logout1'">로그아웃1</button>
    </div>
</body>
</html>


클라이언트에서 입력 된 값이 컨트롤러 핸들러 메서드에서 HttpSession 객체에 잘 담겼음을 응답 화면을 통해 확인할 수 있다.

로그아웃 버튼 클릭 시에는 HttpSession 을 만료 시킨다.

@GetMapping("logout1")
public String logoutTest1(HttpSession session) {
		
	session.invalidate();
		
	return "first/loginResult";
}


세션에서 id 값이 제거 된 것을 확인할 수 있다. 

resources/templates/first 의 하위의 login.html파일에 @SessionAttributes를 사용하기 내용을 추가한다.
<!doctype html>
<html lang="en">
<head>
    <meta charset="UTF-8">
    <title>login</title>
</head>
<body>
	...생략
	<h3>@SessionAttributes를 사용하기</h3>
   <form action="login2" method="post">
        ID : <input type="text" name="id"><br>
        PWD : <input type="password" name="pwd"><br>
        <input type="submit" value="로그인">
    </form>
</body>
</html>


해당 화면에서 사용자 입력 양식에 값을 입력하고 submit 을 누르면 POST 방식의 /first/login2 요청이 발생한다.

발생하는 요청을 매핑할 controller의 handler method이다. 이번에는 Model에 id를 추가한다.

@PostMapping("login2")
public String sessionTest2(Model model, @RequestParam String id) {
		
	model.addAttribute("id", id);
		
	return "first/loginResult";
}


그리고 클래스 레벨에 @SessionAttributes("id")를 설정한다. 클래스 레벨에 @SessionAttributes 어노테이션을 이용하여 세션에 값을 담을 key값을 설정 해두면 Model 영역에 해당 key로 값이 추가되는 경우 session에 자동 등록을 한다.

@Controller
@RequestMapping("/first/*")
@SessionAttributes("id")
public class FirstController {
	...생략
}


세션에 값이 잘 저장 되었음을 응답 화면을 통해 확인할 수 있다. 단, 로그아웃 버튼을 눌러도 세션 객체가 제거 되지 않는 문제가 있다. 따라서 로그아웃 버튼도 다시 추가해서 로그아웃 로직을 추가 작성한다.

loginResult.html 파일을 수정한다.

<!doctype html>
<html lang="en">
<head>
    <meta charset="UTF-8">
    <title>loginResult</title>
</head>
<body>
    <h1>Session에 담긴 값 확인하기</h1>
    <h3 th:text="|${ session.id }님 환영합니다.|"></h3>
    <div>
        <button onclick="location.href='logout1'">로그아웃1</button>
				<button onclick="location.href='logout2'">로그아웃2</button>
    </div>
</body>
</html>
SessionAttributes로 등록된 값은 session의 상태를 관리하는 SessionStatus의 setComplete()메소드를 호출해야 사용이 만료된다.
@GetMapping("logout2")
public String logoutTest2(SessionStatus sessionStatus) {
		
	/* 현재 컨트롤러 세션에 저장된 모든 정보를 제거한다. 개별 제거는 불가능하다. */
	sessionStatus.setComplete();
		
	return "first/loginResult";
}


세션에서 id 값이 제거 된 것을 확인할 수 있다.

728x90
반응형

+ Recent posts